

Intraoral Scanner: Illustrated Scanning Trajectory & Operating Procedures
Numerous intraoral scanner brands are available on the current market, yet their operational workflows are largely similar.
This article shares illustrated operating techniques for intraoral scanning trajectories. It delivers practical operational tips for dentists already using intraoral scanners, and offers intuitive insights for practitioners considering adopting this digital device.
Pre‑scan Preparation Notes
Before initiating scanning, observe the following pre‑operation checks:
Verify the scanner connection status. Connection protocols vary across different intraoral scanner brands.
Remove the protective cap and fit a sterilized scanning tip. Note: protective caps are not equipped with reflective lenses.
Warm‑up the scanning tip. The warming period ranges from 20 seconds to 2 minutes, subject to ambient room temperature.
Benefits of scanning tip pre‑warming: it minimizes patient discomfort when the tip is placed inside the oral cavity, and prevents fogging caused by intraoral exhaled breath, which could compromise scanning workflows and data accuracy.
Scanning Method 1: Multi‑segment S‑Shaped Trajectory Scanning
Scanning sequence: Occlusal surface → Labial/Buccal surface (or Lingual surface) → Lingual surface (or Labial/Buccal surface). Moderately tilt and rotate the scanner probe throughout acquisition.
As illustrated in the diagram, start from the occlusal surface on one side of the dental arch. Follow an S‑shaped path: occlusal surface → lingual surface → labial‑buccal surface. Rotate the scanning tip moderately to capture every tooth, and complete full‑arch scanning progressively.
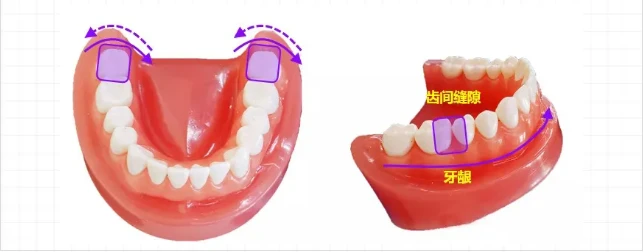
Perform targeted supplementary scanning afterwards: distal surface of the most posterior molar, interproximal contact gaps across the dental arch, local gingival tissues, and regions flagged by the scanner software.
Pausing is permitted during scanning. When resuming acquisition, return to or approach the previously scanned area near the pause point. Avoid random jumping to distant sites.

Scanning Method 2: Segmented Sequential Scanning
Workflow: Scan occlusal surfaces first, then navigate to lingual surfaces, and finally capture labial‑buccal surfaces. This method consists of three distinct scanning passes:
Occlusal pass: Commence at the distal end of posterior molars. Scan occlusal surfaces, perform a Z‑shaped sway across incisors of anterior teeth (canine‑to‑canine), continue across the opposite occlusal arch, and end at the distal molar.
Lingual‑surface pass: Wrap the scanning tip around the distal molar corner to access lingual sides. Scan posterior molars, anterior teeth, and molars on the contralateral side.
Labial‑buccal‑surface pass: Rotate the tip from the lingual distal molar to buccal surfaces. Capture posterior molars, anterior labial surfaces, and molars on the opposite side.
Conduct supplementary scanning for posterior molars, gingival zones, and software‑highlighted locations.
Scanning may be paused. Upon resumption, return close to the previously‑scanned pause position. Do not perform jump scanning.

Bite Registration Scanning Protocol
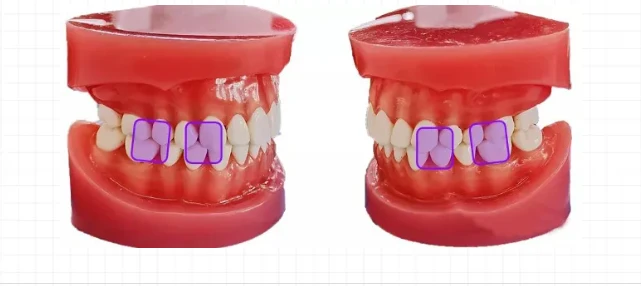
Acquire 3‑4 well‑separated bite contact points via spot scanning.
The applicable bite‑scanning workflow differs among scanner models; always follow brand‑specific guidelines. Multi‑point bite registration delivers simpler, more accurate alignment and higher success rates for automatic bite matching.
Clinical tips for bite scanning:
Instruct patients to bite naturally without excessive clenching, and maintain stable occlusion throughout capture.
Insert the scanning tip sideways into the oral cavity. Retract buccal soft tissues with the outer side of the probe, align the lens toward bite contacts, then press the device button to start scanning.
Validate occlusal accuracy once scanning finishes.

Critical Scanning Techniques & Best Practices
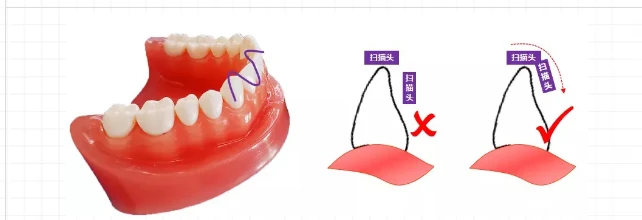
When transitioning from occlusal surfaces to lingual or labial‑buccal surfaces, tilt and rotate the scanning tip along smooth curved motions. Avoid sharp right‑angle rotation, which triggers registration mismatches and inaccurate scan data.
Prioritize supplementary scanning for high‑priority regions:
Distal surfaces of terminal molars
Interproximal spaces
Gingival areas with tissue height less than 3‑4 mm
Intraoral scanners reconstruct 3D models by stacking sequential intraoral images. To balance scanning precision and workflow efficiency, capture only sufficient images for accurate preparation tooth morphology, clear interproximal contacts, and complete reference anatomy of adjacent and opposing teeth; unnecessary frames should be minimized.
Most intraoral scanner manufacturers recommend limiting full‑arch scan frames to approximately 1000 images.
Remark: Post‑processing must remove redundant soft‑tissue artifacts such as irregular distal and gingival margins, otherwise model precision will be impaired. Many intraoral scanning software packages support automatic hole‑filling and final‑model optimization functions.
Generate Final 3D Digital Model
Dental practitioners can export scan data in STL file format. Files can be shared via cloud platforms or email with laboratory technicians. Interactive online digital tooth arrangement can be performed to finalize orthodontic treatment plans.


